Next 200 YTT ~ Nov 20
andean-yoga-icon-512x512
⌘K
Home 200 hrs YTT
Offerings About Contact
Home
2200 hrs YTT
rRetreats
7 Day New Years Retreat - December 27th - January 2nd - 2026
Offerings
aAbout
cContact
Back to products

Thai Massage Course

With Daya Nimai Das
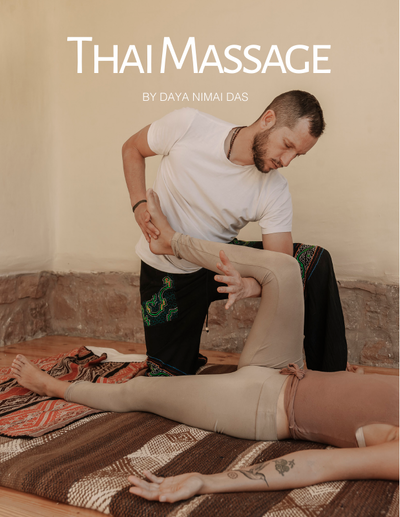
Traditional Thai bodywork, taught the way Daya was taught it: on a mat, fully clothed, working with assisted stretching and steady pressure along the body's energy lines. No oils, no table.

The course walks through the whole sequence — the principles behind the work, the positions, the transitions, and the timing that turns a set of techniques into one continuous practice. Every lesson is illustrated from the sixty-two page manual, which comes with the course as a downloadable PDF.

It is built for two kinds of people: bodyworkers who want to add Thai massage to what they already offer, and practitioners who simply want to be able to give this to the people around them well.

Self-paced. Come back to it as often as you need — this is a practice you learn with your hands, not in one sitting.

Content

Basic Thai Massage — with Daya Nimai Das

Welcome & Foundations
Welcome: What This Course Is
Welcome This course teaches an easy and dynamic routine that combines different techniques inspired by traditional Thai massage — activating the meridians and using a range of manual release techniques. The aim of this course is simple: to give you a practical guide for delivering a complete 90-minute session in a well-rounded and professional manner. Where this practice comes from These forms of healing originate from many traditions, where they have been used as preventive medical treatment, for the healing of injuries, or as a means to induce deep states of relaxation. The benefits of receiving a massage Relieving pain Restoring balance Boosting immunity Emotional release Reducing stress Improving mobility Facilitating circulation How to use this course Work through the modules in order. Modules 1–2 prepare you and the space; Modules 3–7 walk the full 14-step sequence from the feet to the crown of the head; Module 8 holds your reference materials, including the complete manual as a PDF download. Practice each step slowly and often — don't add any new movements or energetic work until you have mastered the sequence by heart.
Preparation: The Appointment, the Environment & the Space
Preparation A great session begins long before the first touch. Prepare on three levels: the appointment, the environment, and the physical space. The appointment Give clear instructions on how to arrive and the expected time of arrival. Ask your client to bring suitable, comfortable clothing for the practice. Recommend your client come on a light stomach if they want to receive belly massage. Arrive early yourself, to cleanse and set up your space. The environment Look for a warm, silent and well-illuminated space. Light a candle, burn some incense, and put on instrumental or meditation music. Clean and air out the room before the start of the session. Turn off cellphones or put them into airplane mode. Set up the space You need a space big enough to place a three-layered blanket on the floor and still move around it freely. Have an extra blanket ready in case the receiver feels cold or requests an extra layer. This massage doesn't require the client to expose any body parts — ask them to bring comfortable clothing. Make room for the receiver's personal belongings.
Know Your Client, Types of Touch & Energy Lines
Before you begin: three essentials 1. Know your client Take a moment to sit with your client and understand where they are coming from. Let them know we are not specialized doctors or certified physicians — all we do is help restore the flow of energy throughout the body. Most people come to release stress or physical fatigue, or to overcome an energetic / emotional blockage. ⚠️ Contraindications — avoid massaging under these conditions: Injuries or inflammation Sickness or chronic pain Pregnancy Altered states Children and advanced age Mental health issues 2. Types of touch Giving or receiving a massage can be a very profound experience — an opportunity to create a very safe container in which to be held. Avoid at all times any type of sensual or explorative touching, and be especially aware when working near sensitive areas such as around the breasts and the space between the hips. Your touch must be firm and precise — sensitive, practical and technical at all times. Don't practice any kind of energetic healing or add new movements until you have mastered the sequence by heart. 3. Energy lines The approach of this massage is to unblock and remove stagnant energy stored in the physical body. With a clear idea of the mapping of the meridians, you will use manual releasing techniques such as thumb pressing and palm pressing. Remember: all lines are made of points. Work leaving a 3-inch space (about two finger-widths) between each press. The 1-2-3-2-1 pattern: the most common pattern in this massage. Divide the area at hand into three equal parts and distribute your presses accordingly — out along points 1, 2, 3, then back through 2 to 1.
Opening the Space
Savasana & a Short Grounding Meditation
Open the space Savasana To start the massage, ask the receiver to come into Savasana: lying down, facing up. Make sure: Feet are wider than the hips Toes point out to the sides Hands rest wider than the feet Shoulders are relaxed The head rests comfortably on the mat Short meditation Most people arrive straight from their daily activities and need some grounding before they can receive this healing practice. Guide them through a short meditation — breath awareness, feeling into different body parts — and encourage them to put everything aside for a moment and simply receive.
The Opening Prayer
Opening prayer Invoking a deity, a virtue or a higher principle can be very auspicious before the beginning of the massage. You may use any specific mantra you know. Here is a short list: Aim Shree Gurave Namaha — to the teacher Om Mani Padme Hum — compassion Om Gan Ganapataye Namaha — remover of obstacles Om Shivaya Namaha — consciousness and liberation
The Sequence — Feet & Legs
Step 1 — Feet and Legs
Step 1 · Feet and legs Opening the legs Sitting between both feet: Palm pressing Shake the legs Pull the heels Soles: palm pressing & reflexology Starting above the heel, press the three points along the soles of the feet. Technique: thumb press down, circle and release. Top of both feet Return to palm pressing, then simultaneously work the 5 lines from the talus to the phalanges. Technique: rub down, squeeze, and pull the toes back. Points on the arch of the feet Back to palm pressing, then simultaneously press these points on both feet: The point closer to the heel The point on the high arch of the foot The point below the big-toe mound Technique: thumb press down, circle and release — in the 1, 2, 3, 2, 1 pattern. Finish with palm pressing to close the feet.
Step 2 — Calves and Thighs · Part 1
Step 2 · Calves and thighs — Part 1 Bend the receiver's knee, bringing their heel into the inner thigh of the opposite leg. Transition: come closer and support the bent knee on top of your thighs, while sitting on your heels. Calf technique Work the line below the tibia: start above the Achilles tendon, pass through the soleus and the upper gastrocnemius, pressing thumbs every two inches. Inner thigh technique Work the adductor lines three-quarters of the way up, leading toward the hip area. Use these techniques progressively: Palm pressing Thumbs down Elbow rolling Traction with the foot Transition: open the receiver's foot to the side, sit back and extend your leg forward, placing your foot below their knee. Grab the client's foot firmly. Apply the 1-2-3-2-1 technique, distributing the pressure points evenly on the back of the thigh. Apply traction: pull with your hand and push with your foot simultaneously. Foot-over-shin pressing Extend the leg and bring the receiver's foot over your inner shin. Lock one foot under the knee and press with the other, applying the 1-2-3-2-1 technique along the back of the thigh. Walking the thigh Transition: open their foot to the side, creating space to walk on the back of the thigh with both feet — bring your toes to the middle of the thigh, toes looking up. Then bring the receiver's foot over both shins while folding the leg. Sit closer, open your knees, and: Massage the top of the thigh Massage the inner thigh Lifted-leg pressing Transition: bring your foot sideways, toes pointing externally under the knee. Lift their leg toward the center of the body, using a pointed index-finger position, and apply the 1-2-3-2-1 technique on the back of the thigh.
Step 3 — Calves and Thighs · Part 2
Step 3 · Calves and thighs — Part 2 Transition: while holding your pointed index finger, sit back on your heels and slowly bring their knee down, placing the receiver's foot between your knees. Interlocked hands on the thigh Interlock your fingers over the thigh, palms on either side, and apply the 1-2-3-2-1 technique from knee to hip — working the adductor and IT lines simultaneously. Roll in circles toward the client's body, pressing firmly at the end of each circling motion, moving from point to point until completion. Interlocked hands on the calf Place your interlocked fingers behind the calf. Roll the hands in circles toward your client, finishing with a slight press — 1-2-3-2-1 from knee to heel and heel to knee. Keeping fingers interlocked, lean back and gently pull the calf in the same 1-2-3-2-1 manner, knee to heel and back. Outer shin line Finally, work the line of the outer shin from knee to heel, using your thumb-pressing technique every two inches.
The Sequence — Hips & Twist
Step 4 — Hip Range and Mobility
Step 4 · Hip range and mobility Transition: lift the knee, placing your forearm below it. Bring one of your knees to the floor and one foot forward. Start drawing big circles with the leg — first externally, then internally. Apply the 1-2-3-2-1 technique on the back of the thigh while moving through the range of the hips. Bring knee to chest, then bring the foot to the outside of the extended leg.
Step 5 — The Twist Side Stretch
Step 5 · Applying the twist side stretch From your current position, place the receiver's knee to the side, supporting their hips with your thighs in a seated posture. Press your hand on their shoulder as leverage, deepening the stretch. Gently release by letting the hips come back to their original position. Place your forearm behind the thigh, bring knee to chest, and straighten the leg. Close this half: palm-press on both feet — then repeat Steps 2–5 on the other side.
The Sequence — Belly, Chest, Arms & Hands
Step 6 — The Belly Massage
Step 6 · Belly massage technique Position: sit on your heels on the left side of the body. Left hand on the wrist, right hand on the diaphragm. Feel the breath moving through the belly. Draw three clockwise circles to begin. Imagine the whole belly as a clock — the diaphragm is 12 o'clock. Technique 1 — the oceanic motion Use both hands to create an oceanic motion between the left and right side of the stomach. Be gentle, and let one hand follow the other. Technique 2 — the clock Pressing down with the palm of the hand, slide gently toward the center at each point. Use the imagery of the clock: 7 o'clock — appendix, large intestine 9 o'clock — gall bladder 11 o'clock — liver, small intestine 12 o'clock — stomach, liver 2 o'clock — spleen, pancreas 3 o'clock — descending colon, kidney 5 o'clock — descending colon, vesicle Closing Return to the oceanic movement and draw three clockwise circles on the belly.
Step 7 — Opening the Chest
Step 7 · Opening the chest From the 12 o'clock point on the belly, work your way up to the sternum, drawing small circles — consider this the middle line. Three inches on either side of the middle line, press down with the thumbs, circle, and release. Repeat the same procedure two more times, each time from the previous set of points. Apply the 1-2-3-2-1 technique.
Step 8 — Working the Arms
Step 8 · Working the arms Starting with the left arm, follow the yin meridian lines using the crab-walk technique: begin under the armpit, skip the elbow, and continue down to the wrist. Tip: look for the line below the humerus.
Step 9 — Working the Hands
Step 9 · Working the hands Transition: move and sit cross-legged where the receiver's fingers are pointing, coming into a handshake position. Work the yang forearm meridians on the outer side of the forearm. Hold the wrist firmly with one hand and, interlocking your fingers with the other, rotate the receiver's wrist in both directions, adding a slight pull at the end. Bring the palm facing up. Palm work Interlock your fingers as shown in the picture: Slide through the whole surface of the hand. Press the release points with both thumbs. Back of the hand & fingers Transition: turn the palm of the hand facing down. Use your thumbs to slide sideways, from the center of the hand toward the edges. Grab the wrist firmly with one hand and slide — like squeezing a toothpaste tube — from the base of the palm toward the tip of each finger. Bend the receiver's elbow, come closer, hold their wrist firmly, and squeeze the fingers of the hand up and release. From the handshake position, lift the elbow from the floor and shake gently, then place the elbow down, gradually resting the hand on the floor. Repeat Steps 8–9 on the other side.
The Sequence — The Backside of the Body
Step 10 — The Backside of the Body
Step 10 · The backside of the body Transition: ask the receiver to turn around — you can provide a small pillow for the face. Tip: this is a good moment to ask if they need to use the restroom. Feet, from the back Coming back to the feet of the receiver, take a moment for yourself. When you are ready: Engage the acupressure points on the inner arch of the feet. Massage the heels, drawing gentle circles. Bend the receiver's knees, hands on heels, and press the toes down with your forearms. Prep the legs for the back stretch Widen the knees wider than the hips. Place one foot behind the back of the knee and lock it by closing the leg. With the palm of the hand, apply the 1-2-3-2-1 technique on the back of the thigh. Open the knee lock, release the foot, and step in — pressing firmly with your foot on the back of the thigh, applying the 1-2-3-2-1 technique. Repeat on the other side. The back Transition: release the legs and situate yourself in between, placing your knees on top of the glutes. Lean forward and massage the entire back with your hands. Walk up the spine toward the shoulder blades, then back to the sacrum. Come to the sides of the receiver's body, applying pressure points on the sides of the upper glutes, on both sides. The back stretch Transition: step back and bend the receiver's knees to create a comfortable seat. Sit firmly on top of the soles of their feet. Leaning forward, grab both forearms, ask for an inhale — and on the exhale, gently pull the arms back. Their chest lifts effortlessly, bringing the gaze forward. Slowly release back to the original position, release the hands and feet, and extend their legs back down.
Step 11 — The Shoulder Blade Release
Step 11 · Shoulder blade release Transition: come sit on your heels next to the ribs of the receiver's body. Ask for your client's hand and bring it back with a folded elbow, leaving the top of the hand resting on their lower back and placing the floating elbow on top of your thighs. One hand goes below the shoulder, slightly pulling up and back, opening the shoulder-blade ridge. With the free hand, use your fingertips to enter the soft area behind the shoulder blade. You may also use your thumbs. Repeat on the other side.
The Sequence — Neck, Head & Closing
Step 12 — Neck, Head and Face
Step 12 · Neck, head and face Transition: ask the receiver to turn around one last time (facing up). Sit cross-legged above their head. Neck Press using 1-2-3-2-1 on top of both trapezius muscles — starting with the point closest to the neck and finishing at the one closest to the ridge of the collarbone. Placing one hand behind the head, assist the receiver to look to one side; use the free hand to work the top of the trapezius, pressing with your thumbs. When they look up, use your pointed fingers to press slightly upward, moving progressively from the base of the neck toward the occipital bone. Repeat on the other side. Head Rub the occipital and temporal sides of the skull thoroughly with firm fingers. With your fingertips, apply the shampoo technique on the parietal bone. Face Place your thumbs together in the middle of the hairline and slide them firmly out toward the temples. Repeat three times, covering the space between the hairline and the eyebrows. Press your thumbs into the base of the nasal bone and slide down along the cheekbones. Both thumbs meet at the middle of the upper lip and slide out to the sides. Thumbs meet at the tip of the chin; outline the frame of the jaw toward the ears with the remaining fingers. Massage the masseter muscle with both thumbs.
Steps 13 & 14 — The Finishing Sequence and the Last Move
Step 13 · Finishing sequence — the ears Rub the lobes of the ears and gently pull toward the receiver's body. Rub the cartilage of the ear, pulling gently toward the ground. Rub the upper part of the cartilage, gently pulling toward you. Step 14 · The last move Close the ears with both hands, placing your thumbs over the eyelids without pressing. Stay here for 10 breath counts. Slide your hands back behind the ears, releasing the receiver's body through the crown of the head. Let the receiver rest for a few minutes. The session is complete.
Resources & Next Steps
The 90-Minute Session at a Glance
The full sequence — cheat sheet Use this one-page overview to rehearse the flow until you know it by heart. Opening (± 10 min) Savasana — feet wide, toes out, hands wide, shoulders relaxed Short grounding meditation — breath awareness Opening prayer — optional mantra Front of the body (± 45 min) Feet and legs — palm pressing · shake the legs · pull the heels · soles reflexology · top-of-foot lines · arch points Calves and thighs, part 1 — calf line below the tibia · adductor lines · traction with foot · foot-over-shin · walking the thigh · lifted-leg pressing Calves and thighs, part 2 — interlocked hands on thigh, calf, and outer shin line Hip range and mobility — big circles out and in · knee to chest Twist side stretch — then palm-press both feet and repeat 2–5 on the other side Belly massage — three clockwise circles · oceanic motion · the clock Opening the chest — sternum line and side points, 1-2-3-2-1 Working the arms — crab walk along the yin lines Working the hands — forearm yang lines · wrist rotation · palm · fingers · repeat 8–9 other side Back of the body (± 25 min) The backside — arch points · heels · knee-bend press · leg locks · back walk · glute points · seated back stretch Shoulder blade release — folded elbow, fingertips behind the blade, both sides Closing (± 10 min) Neck, head and face — trapezius 1-2-3-2-1 · occipital line · shampoo technique · face lines Finishing sequence — the three ear rubs The last move — close the ears, thumbs over eyelids, 10 breaths, release through the crown Key principles: firm and precise touch · 3-inch spacing between presses · the 1-2-3-2-1 pattern · always work both sides.
Appendix: Meridian Maps & Acupressure Points
Appendix — reference charts Two references to support your understanding of the energy lines you are working with throughout the sequence: The eight confluent points on the ankles — gall bladder, spleen, liver, kidney and bladder lines around the feet and ankles. Yin and yang meridians of the body — the full map of the lines you activate during the massage. Remember: all lines are made of points. Keep a 3-inch (two-finger) spacing between presses, and divide each area using the 1-2-3-2-1 pattern.
Thai-Massage-Manual-Daya-Nimai-Das-thumb
Download the Complete Manual (PDF)
The complete manual The full 62-page Thai Massage manual by Daya Nimai Das — with all photographs, techniques and charts — is attached to this lesson as a PDF. Download it, print it if you like, and keep it next to your mat while you learn the sequence. Photography, edition & design: Celia Cueto — www.celiacueto.com
About Daya & the Andean School of Yoga
About your teacher Daya Nimai Das teaches at the Andean School of Yoga, weaving traditional Thai massage, meridian work and manual release techniques into practical, heart-centered training. 🌐 www.andeanyogaschool.com 📷 Instagram: @andeanyoga Photography, edition & design by Celia Cueto — www.celiacueto.com
$77
Buy now
Price $77
Buy now
andean-yoga-icon-512x512
Customer service
Terms and conditions
Copyright © 2026 Andean Yoga
Amex Mastercard PayPal Visa
powered by